Installing a WiFi thermostat is one of the most impactful smart home upgrades a homeowner can make—but the wiring is where most people get stuck. Before you buy or install anything, you need to know what your HVAC system requires and whether your home’s wiring is ready.
This guide covers everything: how to identify your HVAC system, what a C wire is and why it matters, and exactly how to solve the no-C-wire problem using the approach recommended in the Owon PCT5231 smart thermostat installation guide.
Step 1: Identify Your HVAC System Before You Start
The single most important step in any WiFi thermostat installation is confirming your system type. Installing the wrong thermostat—or skipping a compatibility check—can leave your HVAC unresponsive or damage control boards.
Remove the faceplate of your existing thermostat and look at the terminal labels on the back. The most common configurations in North American homes are:
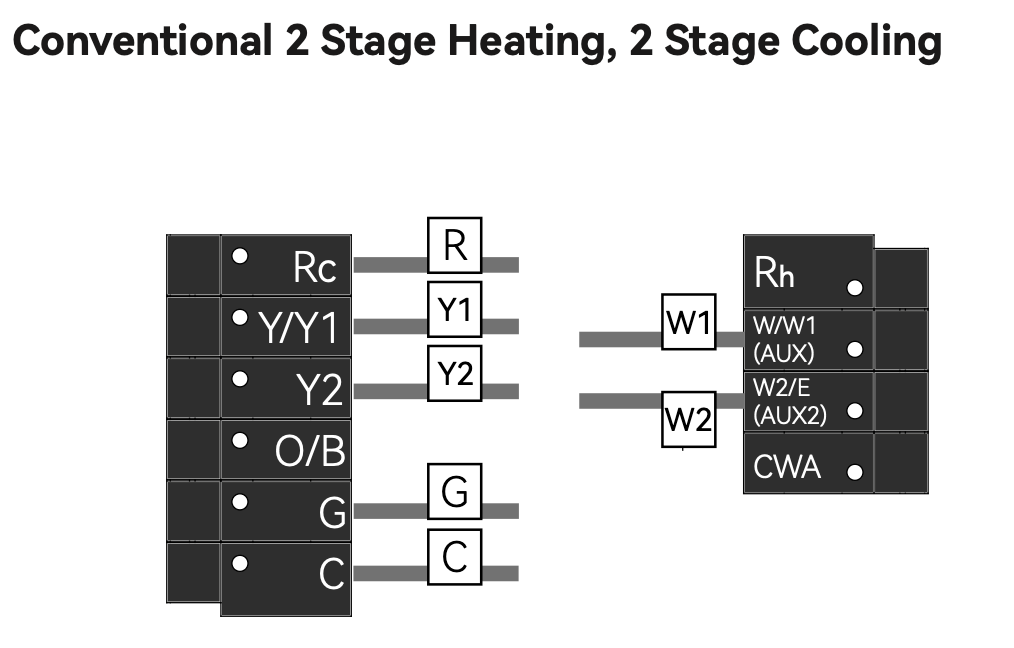
Conventional forced-air systems (gas furnace + central AC): Terminals typically labeled RC, RH, G, Y1, Y2, W1, W2, and ideally C. This is the most common setup and the one the Owon PCT5231 is designed for.
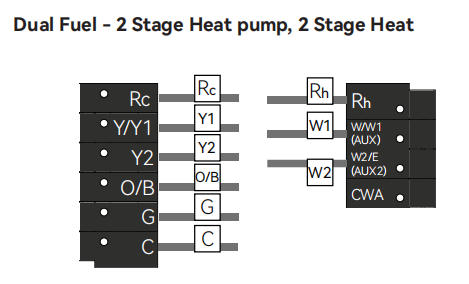
Heat pump systems: Look for an O/B terminal (reversing valve wire) alongside the standard terminals. The PCT5231 supports both conventional and heat pump wiring—it has two rows of terminal labels, one for each system type.
High-voltage systems (110V / 120V / 240V baseboard or line-voltage heating): These use terminals labeled L1 and L2 rather than standard low-voltage labels. The PCT5231 is not compatible with high-voltage systems. If you see these indicators on your old thermostat, stop and consult a licensed HVAC technician.
Millivolt systems (gravity furnaces, gas fireplaces): Very low voltage, generally incompatible with WiFi thermostats.
Pro tip: Photograph your existing wiring before disconnecting anything. This takes ten seconds and prevents hours of troubleshooting if you need to restore the original setup.
Step 2: The C Wire — Why the PCT5231 Requires It
The C wire (common wire) completes the 24V circuit between your HVAC control board and the thermostat, providing continuous low-voltage power. Without it, a WiFi thermostat cannot maintain its display, WiFi connection, or smart features.
The Owon PCT5231 Quick Start Guide states clearly: “The thermostat requires a C wire for power.” This is a hard requirement—not optional. The first thing the guide instructs you to check (Step 3, Compatibility Check) is whether a wire is connected to the C terminal on your old thermostat.
If you already have a C wire, the installation path is straightforward: connect the C wire to the C terminal on the PCT5231 and proceed with standard wiring.
If you do not have a C wire, you will need a C wire adapter for thermostat to make the PCT5231 work. This is covered in detail in the next section.
Step 3: No C Wire? How to Use the C-Wire Adapter
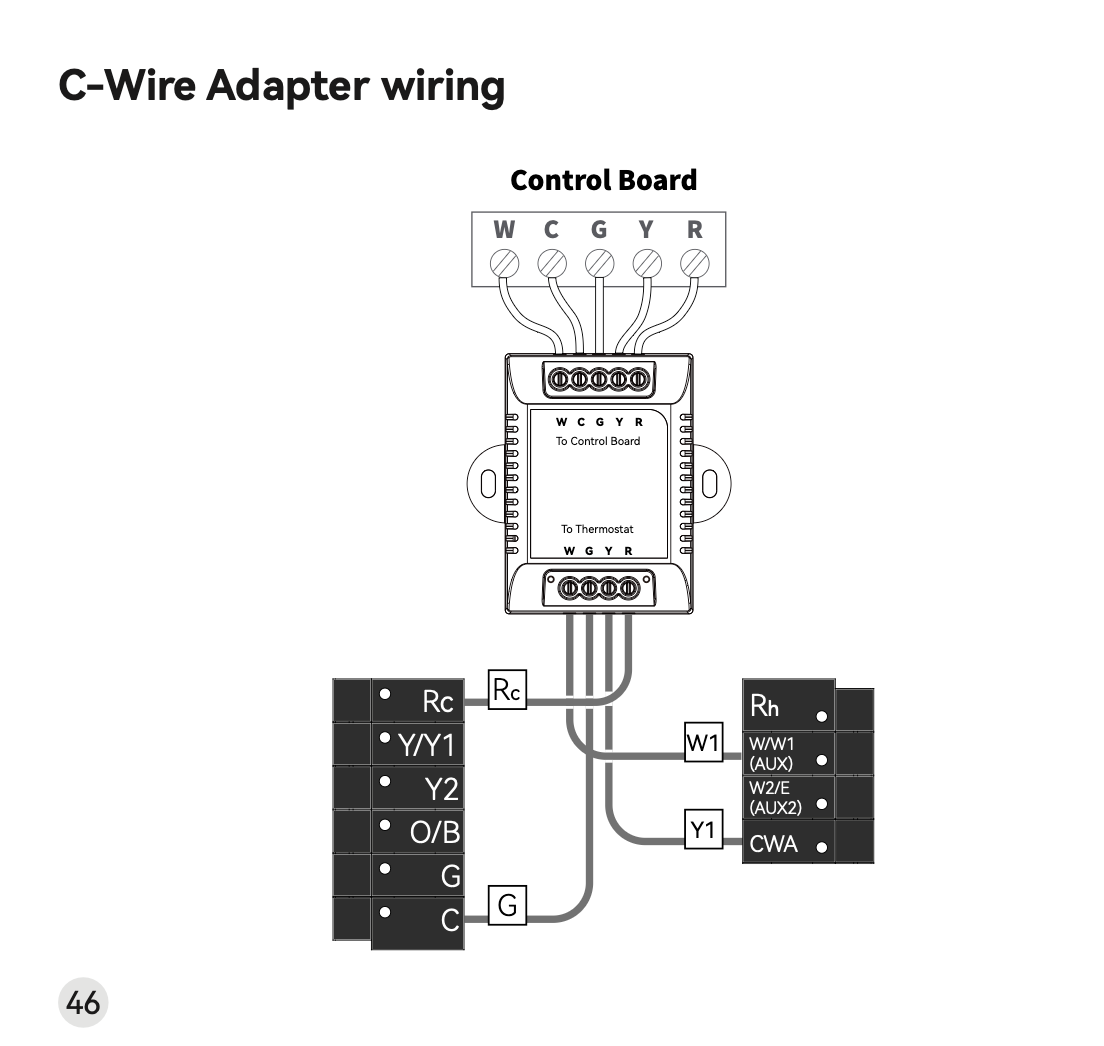
If your home doesn’t have a C wire run to the thermostat wall plate, the PCT5231′s official solution is the C-Wire Adapter—a small module that installs at your HVAC control board (furnace, air handler) and creates a C wire connection without running new cable through the wall.
The C-Wire Adapter is listed as an optional accessory that may be included in the box. If yours didn’t come with one, contact the seller.
Before using the adapter, verify your system has the three required wires:
The adapter works by connecting to your HVAC control board using the existing wires that run between your furnace and thermostat. For this to work, your old thermostat must have wires connected to these three terminals: Y or Y1 (cooling), G (fan), and R, Rc, or Rh (power). If your system does not have all three of these wires available, the adapter cannot be installed and your system is not compatible with the PCT5231.
How the C-Wire Adapter installation works:
- Go to your HVAC system (usually in a basement, attic, or garage).
- Remove the cover of your air handler or furnace control board.
- Photograph the existing wiring on the control board before touching anything.
- Label the four wires going to the thermostat: R (or Rc/Rh), Y/Y1, G, and W/W1.
- Disconnect those four wires from the control board terminals.
- Connect them to the corresponding terminals on the “To Control Board” side of the C-Wire Adapter (labeled W, C, G, Y, R).
- Run the adapter’s output cable to the thermostat wall plate, connecting at the “To Thermostat” terminals (W, G, Y, R).
- The adapter generates the C wire connection—your thermostat wall plate now has a functioning C terminal.
Once the adapter is wired, return to the thermostat wall plate and complete the standard installation.
Step 4: Standard Wiring — Connecting the PCT5231
With either a native C wire or the C-Wire Adapter providing power, you can connect the PCT5231 to your wall plate terminals.
Standard installation steps:
- Turn off power to your HVAC system at the circuit breaker. Do not rely on the thermostat switch alone.
- Remove your old thermostat and photograph the wired terminals.
- Label each wire with the terminal letter it was connected to (wire label stickers are included in the PCT5231 box).
- Remove all jumper wires — short wires connecting two terminals. Do not remove wires coming from the wall.
- Mount the PCT5231 backplate to the wall, feeding the wires through the center opening.
- Connect each wire to its matching terminal on the PCT5231. The PCT5231 terminal row is labeled: RC RH G Y1 Y2 W1 W2 C O/B.
- Snap the thermostat onto the backplate.
- Restore power at the breaker and follow the in-app setup to connect to your 2.4 GHz home WiFi network.
Step 5: Alternate Wiring Configurations Explained
Not every home follows a textbook 5-wire setup. Here are the most common alternate configurations and how to handle them with the PCT5231:
Rh and Rc (split R wire): Some systems separate heating power (Rh) and cooling power (Rc). The PCT5231 has both terminals. If your old thermostat had a jumper connecting Rh and Rc, remove it and connect your single R wire to Rh only.
Heat pump systems (O/B terminal): The PCT5231 supports heat pumps. When installing for a heat pump system, select the heat pump terminal label set (the lower row: L, AUX/E, G, O/B, C, Y, R, RC) rather than the conventional label set. The O/B wire controls the reversing valve and must connect to the O/B terminal.
Identifying conventional vs. heat pump: If the wire currently connected to the W or O/B position on your old thermostat is orange, use the heat pump label set. If it is white, use the conventional label set.
Zoned systems: If your HVAC is controlled by more than one thermostat, it may be a zoned system. For C-Wire Adapter installation in a zoned home, remove the cover from your zone panel instead of the air handler, and connect the adapter there.
No G wire: Some older heating-only systems omit the G (fan control) wire. Without G, the C-Wire Adapter cannot be used, and the system is not compatible with the PCT5231.
Compatibility Summary
| Your Wiring Situation | Compatible with PCT5231? | What to Do |
|---|---|---|
| Has C wire + standard 24V system | ✅ Yes | Direct install, standard wiring |
| No C wire, but has Y/G/R wires | ✅ Yes (with adapter) | Use C-Wire Adapter |
| No C wire, no G or Y wire | ❌ No | System incompatible |
| High-voltage (110V/120V/240V) | ❌ No | System incompatible |
| Heat pump with O/B wire | ✅ Yes | Use heat pump label set |
| Millivolt system | ❌ No | System incompatible |
Before You Begin: Final Checklist
- Confirm your system is 24V low-voltage (not high-voltage line voltage).
- Check whether a C wire is present at the thermostat wall plate.
- If no C wire: confirm you have Y/Y1, G, and R wires before purchasing a C-Wire Adapter.
- Always turn off HVAC power at the breaker before touching any wiring.
- Your WiFi network must be 2.4 GHz—the PCT5231 does not support 5 GHz.
- If wires are short or brittle, use needle-nose pliers to gently pull a little extra slack before connecting.
- When in doubt, consult a licensed HVAC technician—most charge a modest flat fee for thermostat installation.
The PCT5231 is designed to cover the most common North American heating and cooling configurations. Matching your system to the right wiring path before you start is the key to a smooth, successful installation.
For complete wiring diagrams, C-Wire Adapter instructions, and the full step-by-step guide, refer to the Owon PCT5231 Quick Start Guide or visit the product support page.
Post time: May-11-2026